xkeymap.nokeycodeMap = true
to /etc/vmware-server-console/config or ~/.vmare/config
and restart console/player.
There is no need to restart vmware server.
xkeymap.nokeycodeMap = true
to /etc/vmware-server-console/config or ~/.vmare/config
and restart console/player.
There is no need to restart vmware server.
To access Disk Usage Analyzer in Gnome, click on Applications \ Accessories \ Disk Usage Analyzer

When launched, DUA will start up in a stand by state, showing you total system capacity, used and available disk space.

To view the entire file system including usage by individual directories, click the Scan Filesystem icon on the toolbar. When the scan is completed, the full tree of your file system will be displayed.

From this display, you get a nice picture of the disk usage on the entire file system. You can also expand the top level directories and drill down to see sub-directoires and their disk usage, and sort each column to view each directory usage, size and contents. In the right window pane, a graphical layout is displayed. Moving your mouse over a block will display the directory and size.
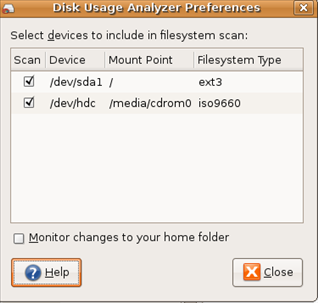
Selecting Edit \ Preferences from the menu, allows selection of any additional devices connected to your Computer that can be enabled or disabled from being monitored.
A feature that I like with Disk Usage Analyzer, is the ability to right click and open the directory by launching Nautilus File Browser.
Checking Disk Space From The Command Line
Another way to view disk usage in Ubuntu is from the Terminal window by clicking on
Application \ Accessories \ Terminal from the panel in Gnome.
Unlike Windows, finding available disk space, from the command prompt, is much easier in Ubuntu using the df command when connected locally or remote via an SSH session.
DF command reports how much free disk space is available for each mount you have. When executing
DF, I like to use the -h option, which returns the output in a more readable format:
greg@lt1:~$ df -h
Filesystem Size Used Avail Use% Mounted on
/dev/sda5 116G 61G 50G 56% /
tmpfs 1.5G 0 1.5G 0% /lib/init/rw
varrun 1.5G 148K 1.5G 1% /var/run
varlock 1.5G 4.0K 1.5G 1% /var/lock
udev 1.5G 176K 1.5G 1% /dev
tmpfs 1.5G 412K 1.5G 1% /dev/shm
lrm 1.5G 2.2M 1.5G 1% /lib/modules/2.6.28-15-generic/volatile/dev/mapper/truecrypt1
DF can also report free disk space for individual directories by entering the following command at the prompt:
ds -h /nameofdirectory
Using df at the command prompt is most usefull when checking disk space on remote computers.
To view more available options with df, enter df –help at the command prompt.
sudo aptitude install sun-java6-jre sun-java6-plugin
sudo aptitude install sun-java5-jre sun-java5-plugin
You can give Super User status to any additional user in Ubuntu by giving SUDO access.
When you set up Ubuntu, it automatically adds the first user to the sudo group. As it doesn't automatically add additional users to the sudo group and if you want to give someone else superuser privileges on your shared system, you'll have to give them sudo access.
To add new users to sudo, you need to use the usermod command. Run sudo usermod -G admin username . However, if the user is already a member of other groups, you'll want to add the -a option, like so: sudo usermod -a -G admin username .
The other way to do this will be by going to System > Administration > Users and Groups.
Select the user you want to add to sudo, and click Properties.
| cd /var/lib/dpkg/info |
| sudo rm -f virtualbox* |
| sudo apt-get update -f |
| sudo apt-get upgrade |